
How to Video Record Yourself Presenting a PowerPoint
Clear and effective presentations are critical to collaborative success. Here we learn how to consistently achieve this, with techniques for recording high-quality PowerPoint presentations with video and audio.
James Moffatt
March 12, 2024
Do you need to record yourself presenting your newest, shiniest PowerPoint? Good, you're in the right place to learn exactly how to do this best.
There are a lot of aspects that culminate in the creation of a dynamic video presentation using Powerpoint, and they do not just revolve around personal skills and public speaking abilities. The tools and software that you choose to help you record yourself and your presentation can go a long way towards presenting you as a professional and experienced presenter, and should therefore be regarded as more than just a simple screen recording method. You have multiple options at your disposal here, so let's jump in and explore the details of each method so that you can make an informed decision.
What is a PowerPoint Presentation?
PowerPoint has stood the test of time, and remains to be a popular tool by Microsoft, commonly used for creating slideshows and presentations. PowerPoint is versatile, and can be leveraged by the user to tailor their presentation in the way that exactly mirrors their vision, with text, images, charts, videos, et cetera, being able to be embedded in the presentation. However, this is all useless if you are unable to present well and drum your point or perspectives into the audience, which can naturally be tricky when presenting in front of your computer screen.
How to Present Well
So when I say 'present well', what am I referring to? Well, in this instance, obviously there are natural factors that can limit fluidity of speech and clarity, such as nerves or pressure to deliver a good point. These are largely intrapersonal skills , but this is just a slice of the whole pie, and in reality, there is a lot more to a successful asynchronous presentation than overcoming these internal battles with yourself.
One of these revolves around setting yourself up for success with the technology you use to present yourself, and your PowerPoint, while presenting remotely . Again, there is more to this than selecting a good webcam or microphone, and in fact, some software can really begin to revolutionize your presentations, by offering fluidity between recording yourself and your PowerPoint, and even allowing the discussions to continue post-presentation. Often, these collaborative softwares can be long-winded and tricky to leverage for a specific task like recording yourself and your presentation, but given that we're on the note of striving to present well, I'll do you a favor and share a tool that is the polar opposite to this later in the article.
First though, let's look at recording yourself and your presentation using PowerPoint itself.
How to Record Presentations with PowerPoint
This involves a few key steps to do with recording itself, but also a couple of steps (1 and 2) that are equally as applicable to any recording method you choose.
- Prepare Your Slides and Script: Make sure your slide deck is well-organized and concise. You don't want to waffle and provide information, and you certainly don't want to regurgitate the slide deck verbally. Remember, your PowerPoint slides are visual aids, not a full script.
- Choose Your Audio and Video Sources: PowerPoint offers multiple options within the "Recording" section, that we will come to, but as we are wanting to include our video, you need to choose your best webcam option depending on what you have available. Naturally, as we are presenting, we need to record audio, and therefore, the same applies regardless of the software you choose.
- Start Recording: Select the area of your PowerPoint you wish to capture, ensure the "Audio" button is active to record your sound, and press the record button to start capturing your presentation.
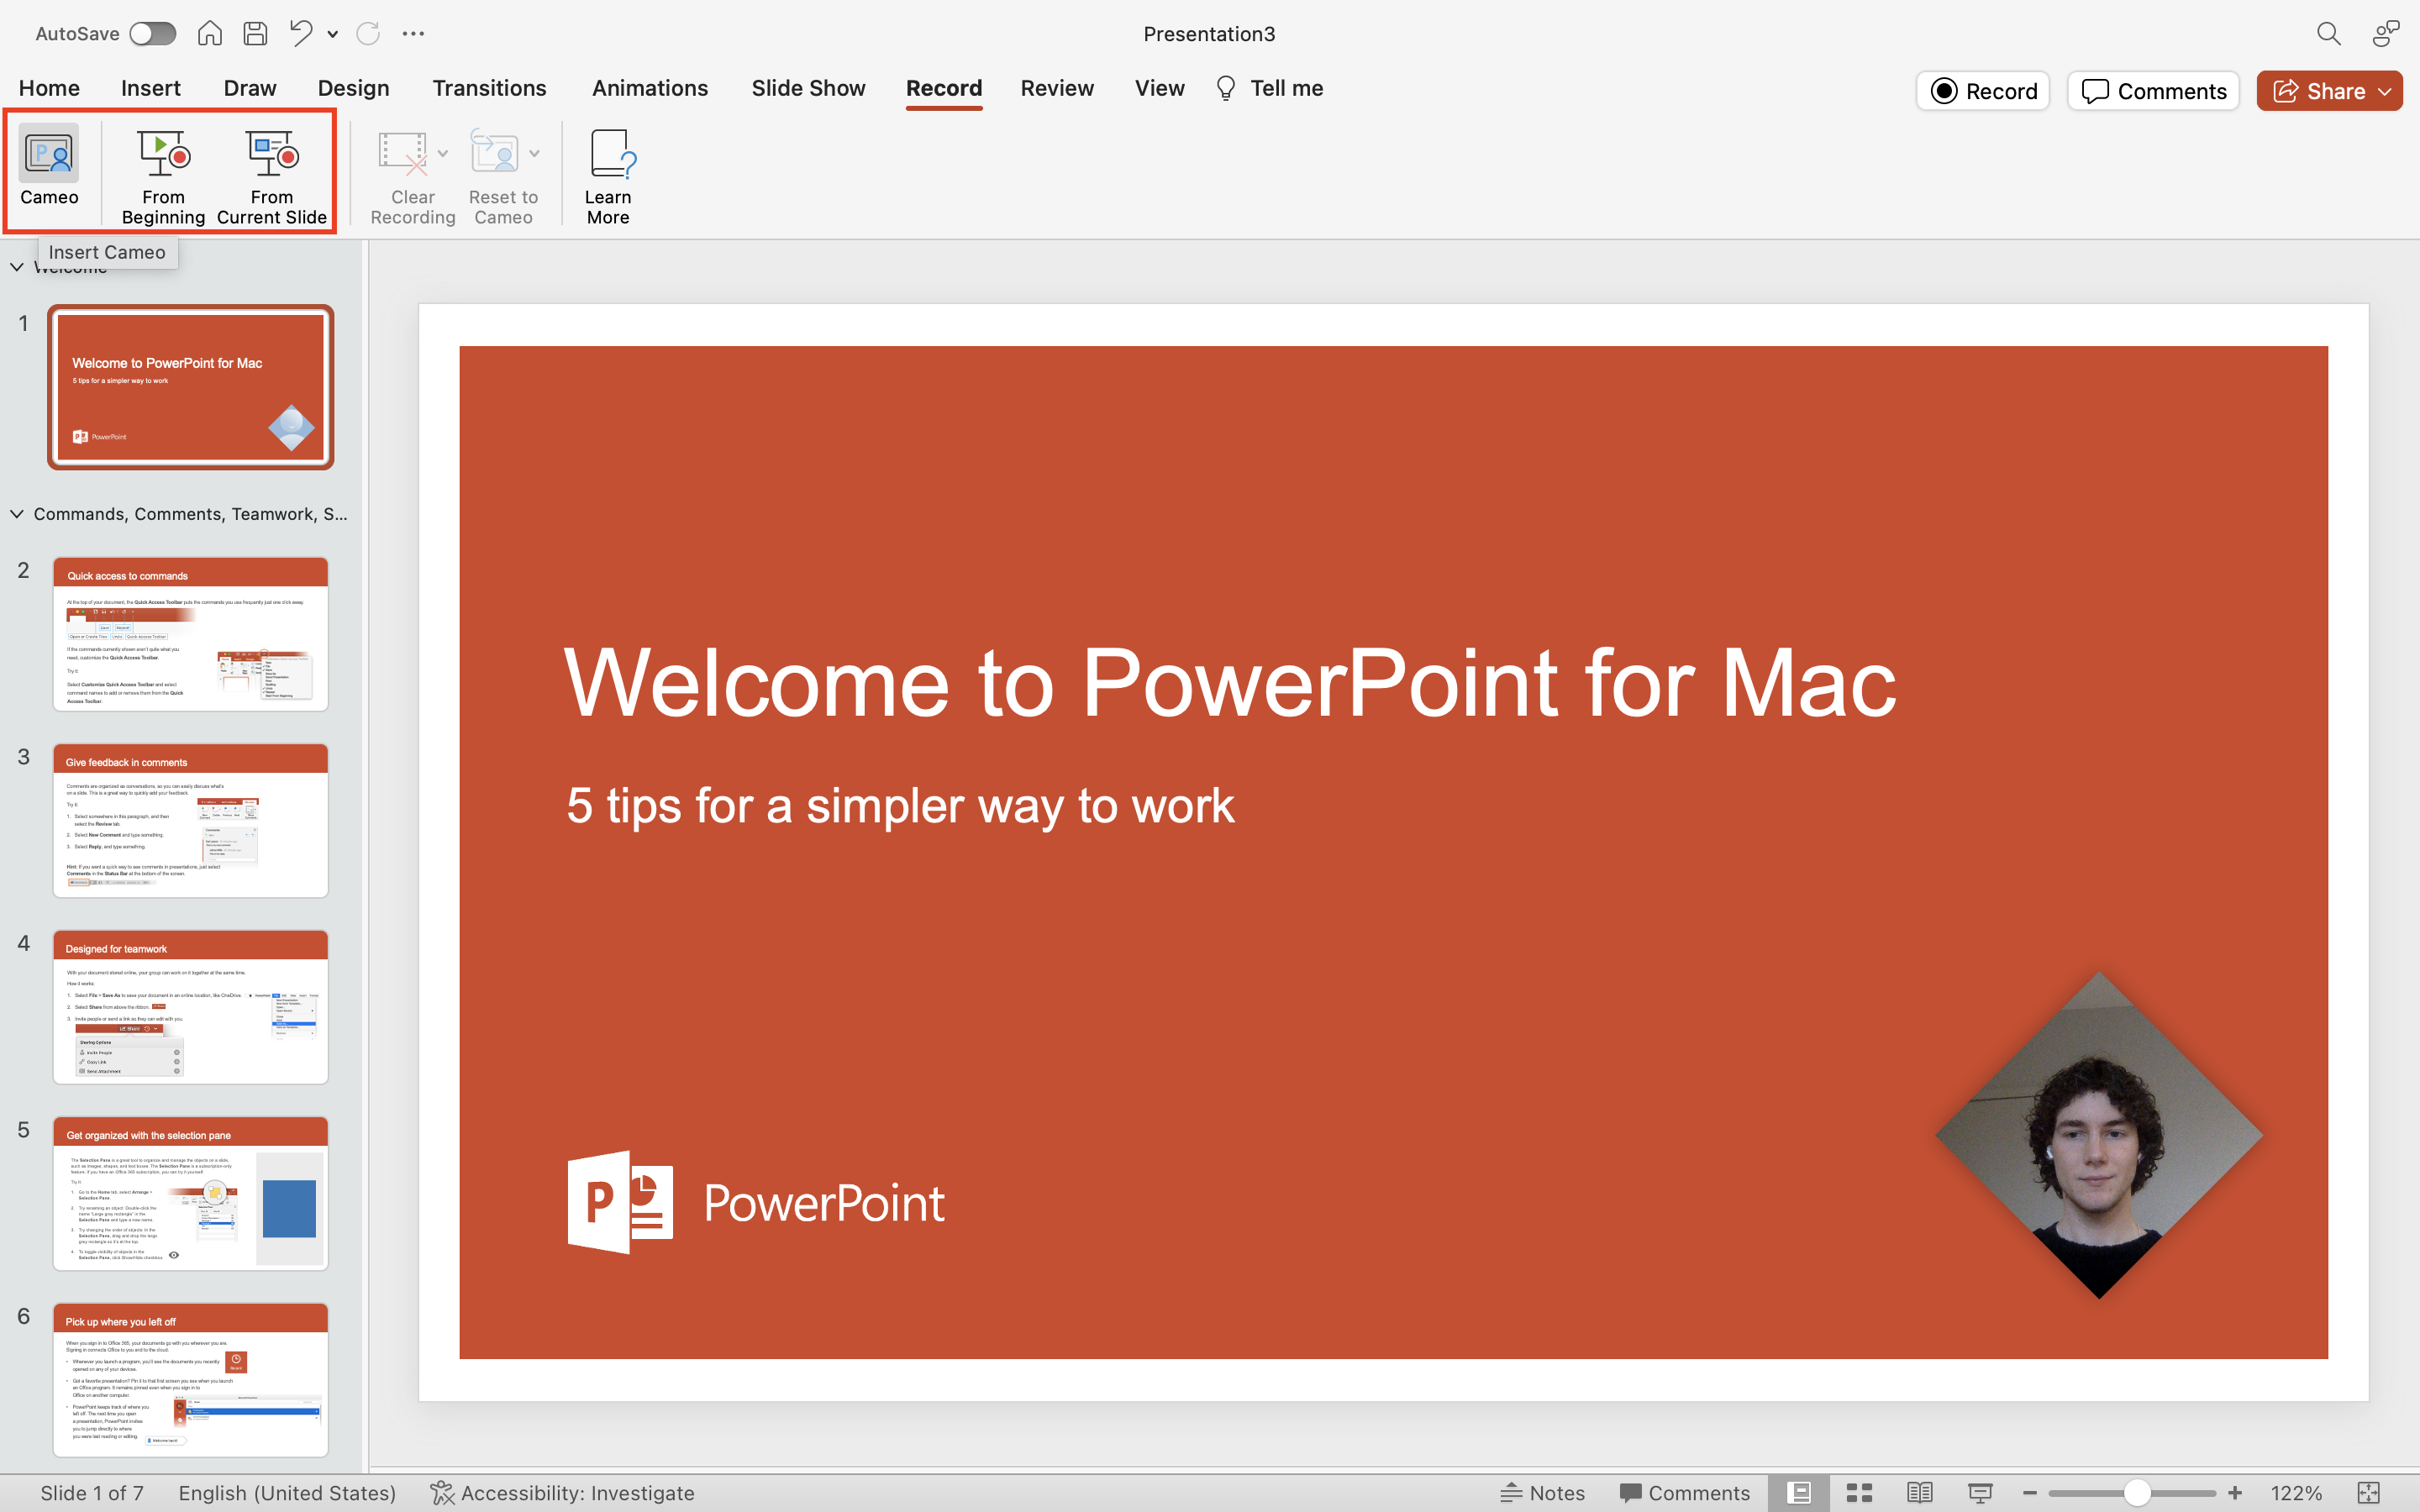
By clicking 'Cameo', you will unlock multiple stylistic options for video recording yourself during your PowerPoint presentation. These range from your more traditional and professional shapes and styles to sillier, more unique styles, as I have attempted to illustrate for you above!
Once you are happy with your video recording set-up for yourself, and feel as though you and your PowerPoint slides are ready to rock, you can go ahead and select one of the two options to the right of 'Cameo', to either start presenting from the beginning, or from the slide you are currently viewing. Let's keep going through the motions and see what happens next.

As you can see, you will now arrive in PowerPoint's screen and video recorder. The drop down arrows to the right-hand side of both the video recorder symbol and the microphone symbol gives you that chance of choosing which webcam and microphone you want to use. You also have some snazzy options to add a splash of colour and to make some notes to help guide you through your presentation while you look into the webcam. There is a preview here to see what your recording is going to look like.
However, PowerPoint's presentation and video recording tool ends here, and does not offer us much more from this stage. For me, this represents a good way to record, but only that. We should always consider the bigger picture when we are looking to excel at work , and by doing so myself, I realise that there is a lot more to being a good presenter and giving a good presentation than efficient meeting and video recording software, or even perfect slides.
Some of this relies on our ability to collaborate and communicate with people to get feedback , and also to continue discussing critical points that may be unearthed throughout the presentation. We cannot do this with PowerPoint, so at this stage, we should begin to explore a third party tool that will allow us to. However, we must be careful not to hinder our ability to achieve what we came here to do, which was learning how to record yourself while presenting your PowerPoint. Luckily, I have discovered one tool that can facilitate both of these things in perfect tandem.
How to Present PowerPoint Using a Third Party Tool
This tool is Bubbles , and in this bubble video , I am going to show you exactly how you can use Bubbles to record yourself while you present your PowerPoint. For a full guide on how to arrive at the stage of recording your first bubble and recording your screen , click this link . Bubbles is easy to use, and as you will see, we don't lose anything in the recording process when using Bubbles, in comparison to PowerPoint. However, what you will see below the bubble, is that what you gain post-presentation is a real game changer.
Make your meetings matter
Loved and trusted by 100,000+ users:
- Automatically Record and Transcribe Meetings
- Extremely Accurate Notes, Summaries, and Action Items powered by AI
- Works with Zoom, Google Meet, and Microsoft Teams
- Save time and follow-up with quick async videos
Simply connect your work Google or Microsoft Calendar to get started.

After you stop sharing yourself and your presentation with Bubbles, you will be prompted to sign-up for free or to login. Remember, Bubbles is free, and your presentation is still just one click away.

Once you pass through this stage, you will be reunited with your masterpiece, as shown below, and at this stage, you have the opportunity to name your bubble , or in this case, presentation, as well as adding a description. Once you have done this, go ahead and send this presentation to your audience, either individually, or if they all also see the light, via your Bubbles Workspace with them.
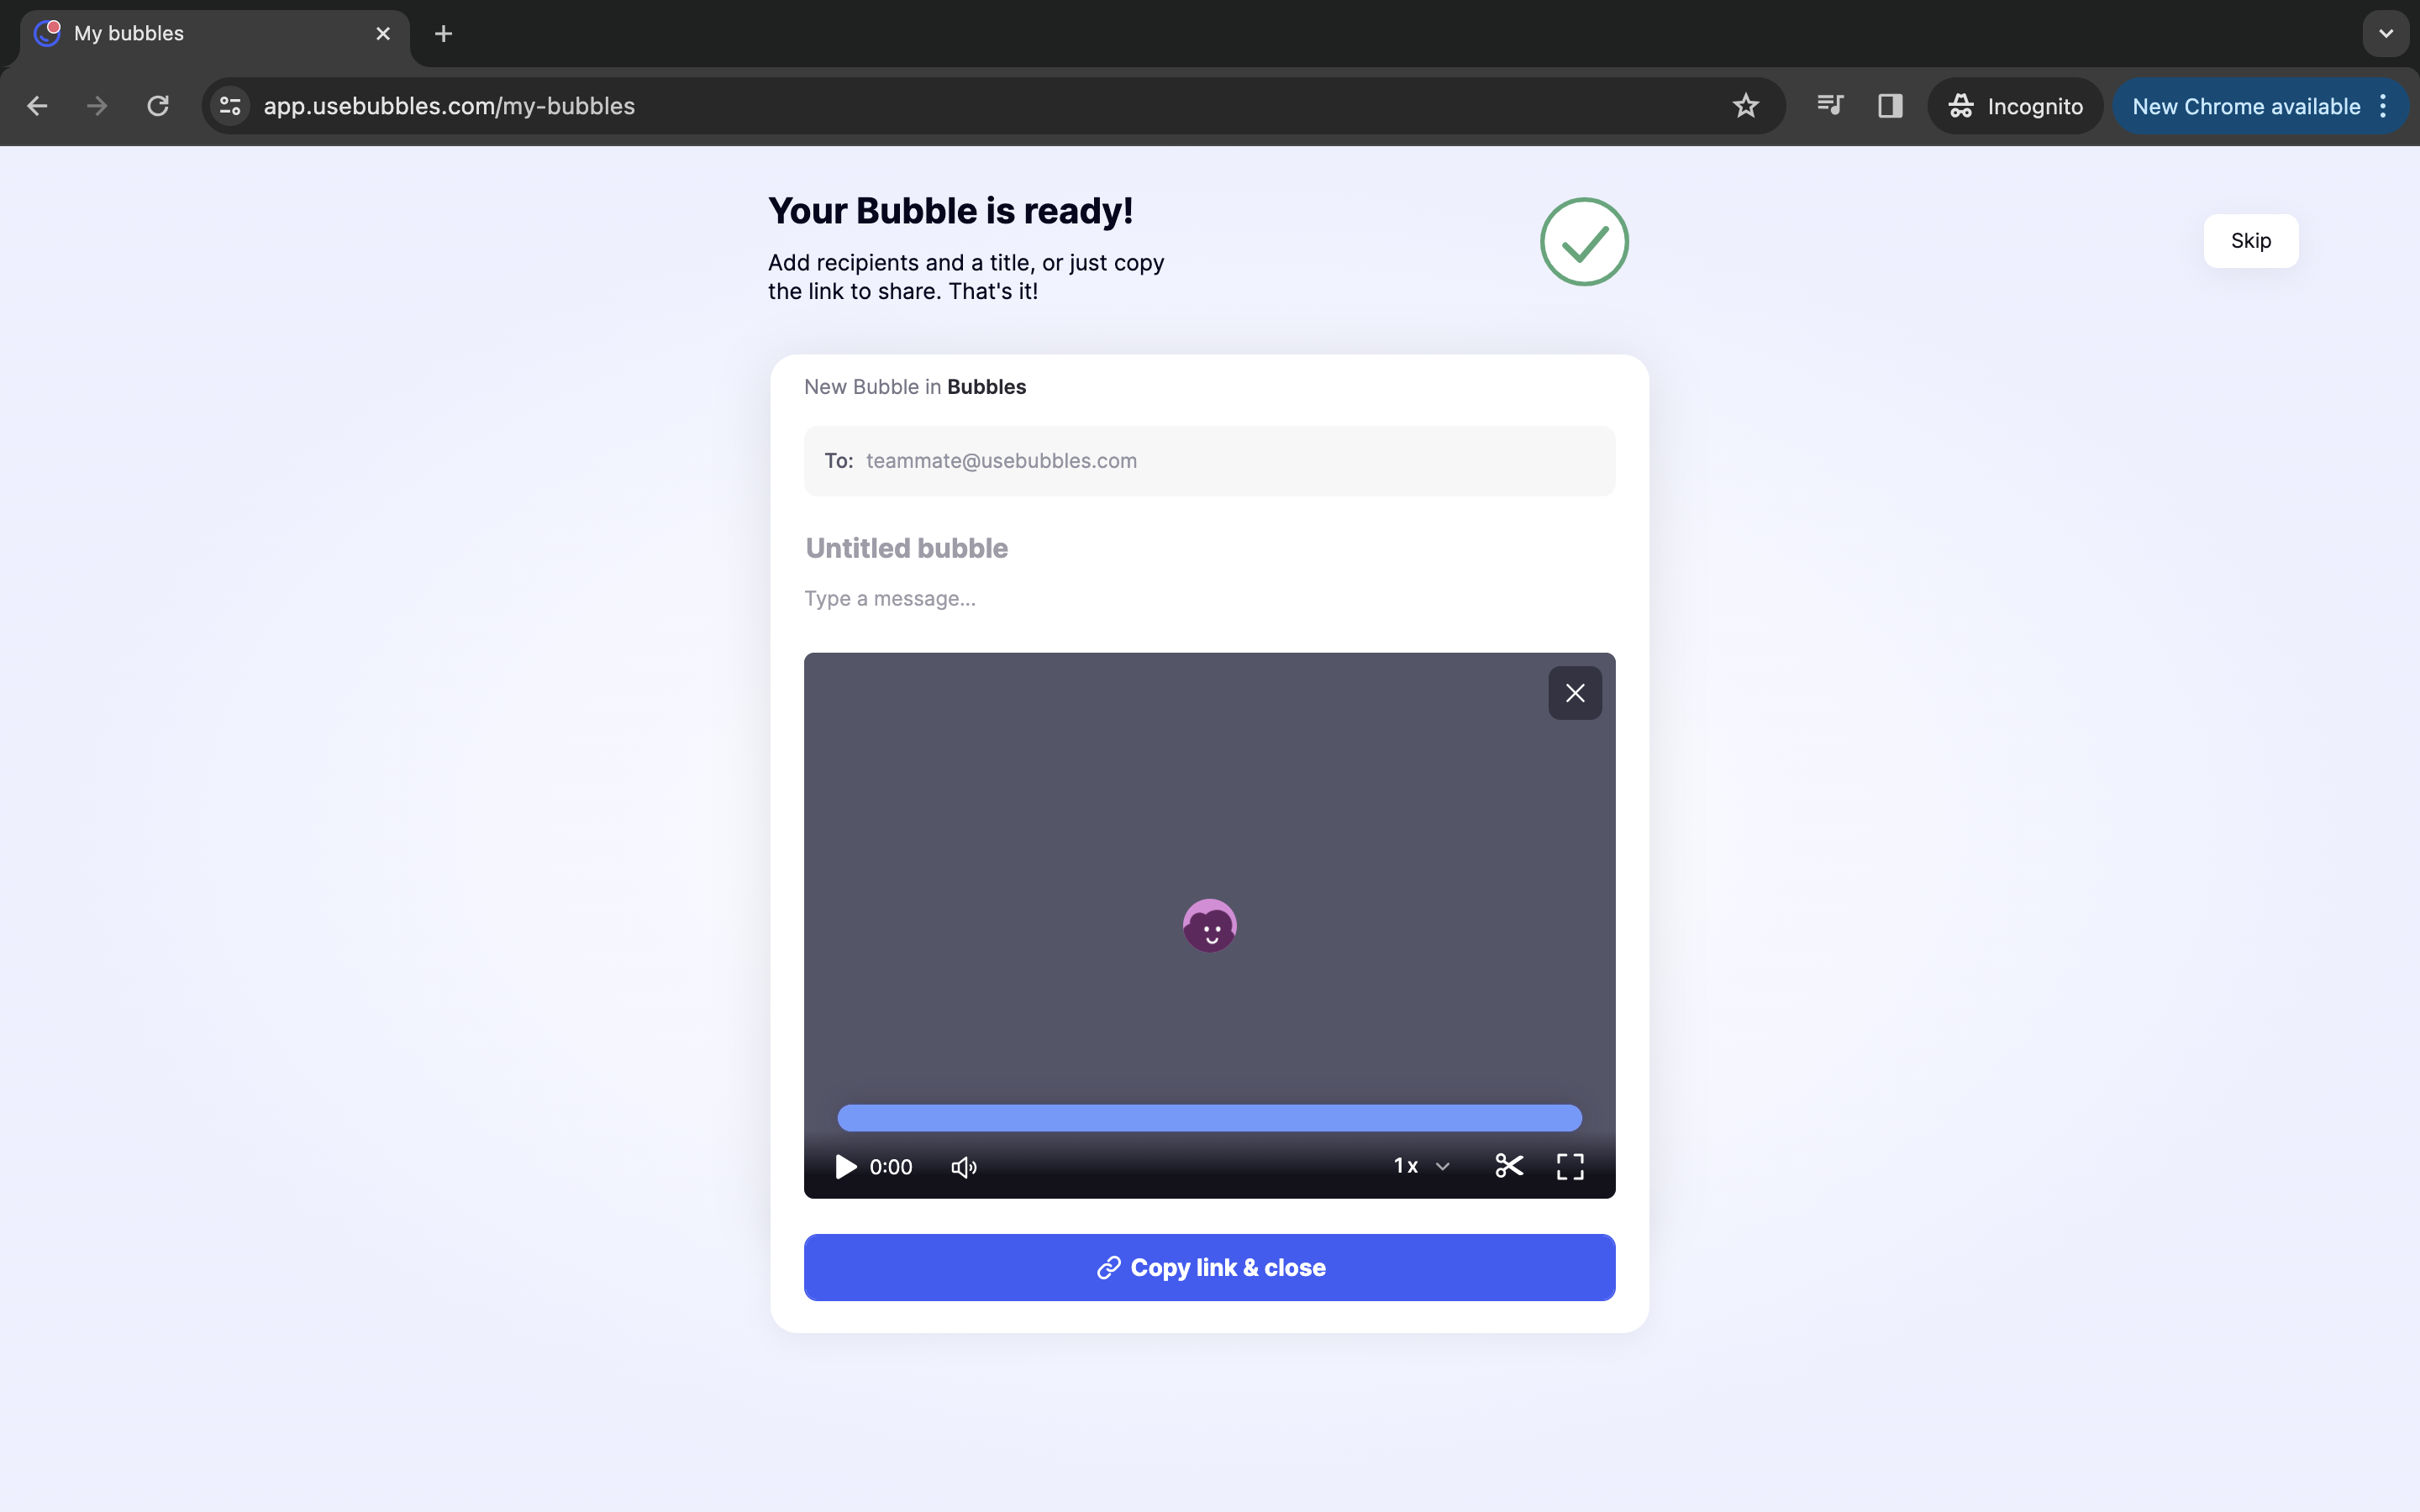
So, you've recorded yourself presenting your presentation, and shared it super easily. The next stage is for your audience to view it and listen to your insights, before offering some of theirs. This can all be done in one area by using Bubbles, hence why I see this as your best option for presenting. Not only does this offer an eased experience, but it also allows for a seamless transition from presentation to discussion and debate . This is something that is critical in the workplace, for both the progression and development of the individual presenting, and the company as a whole.
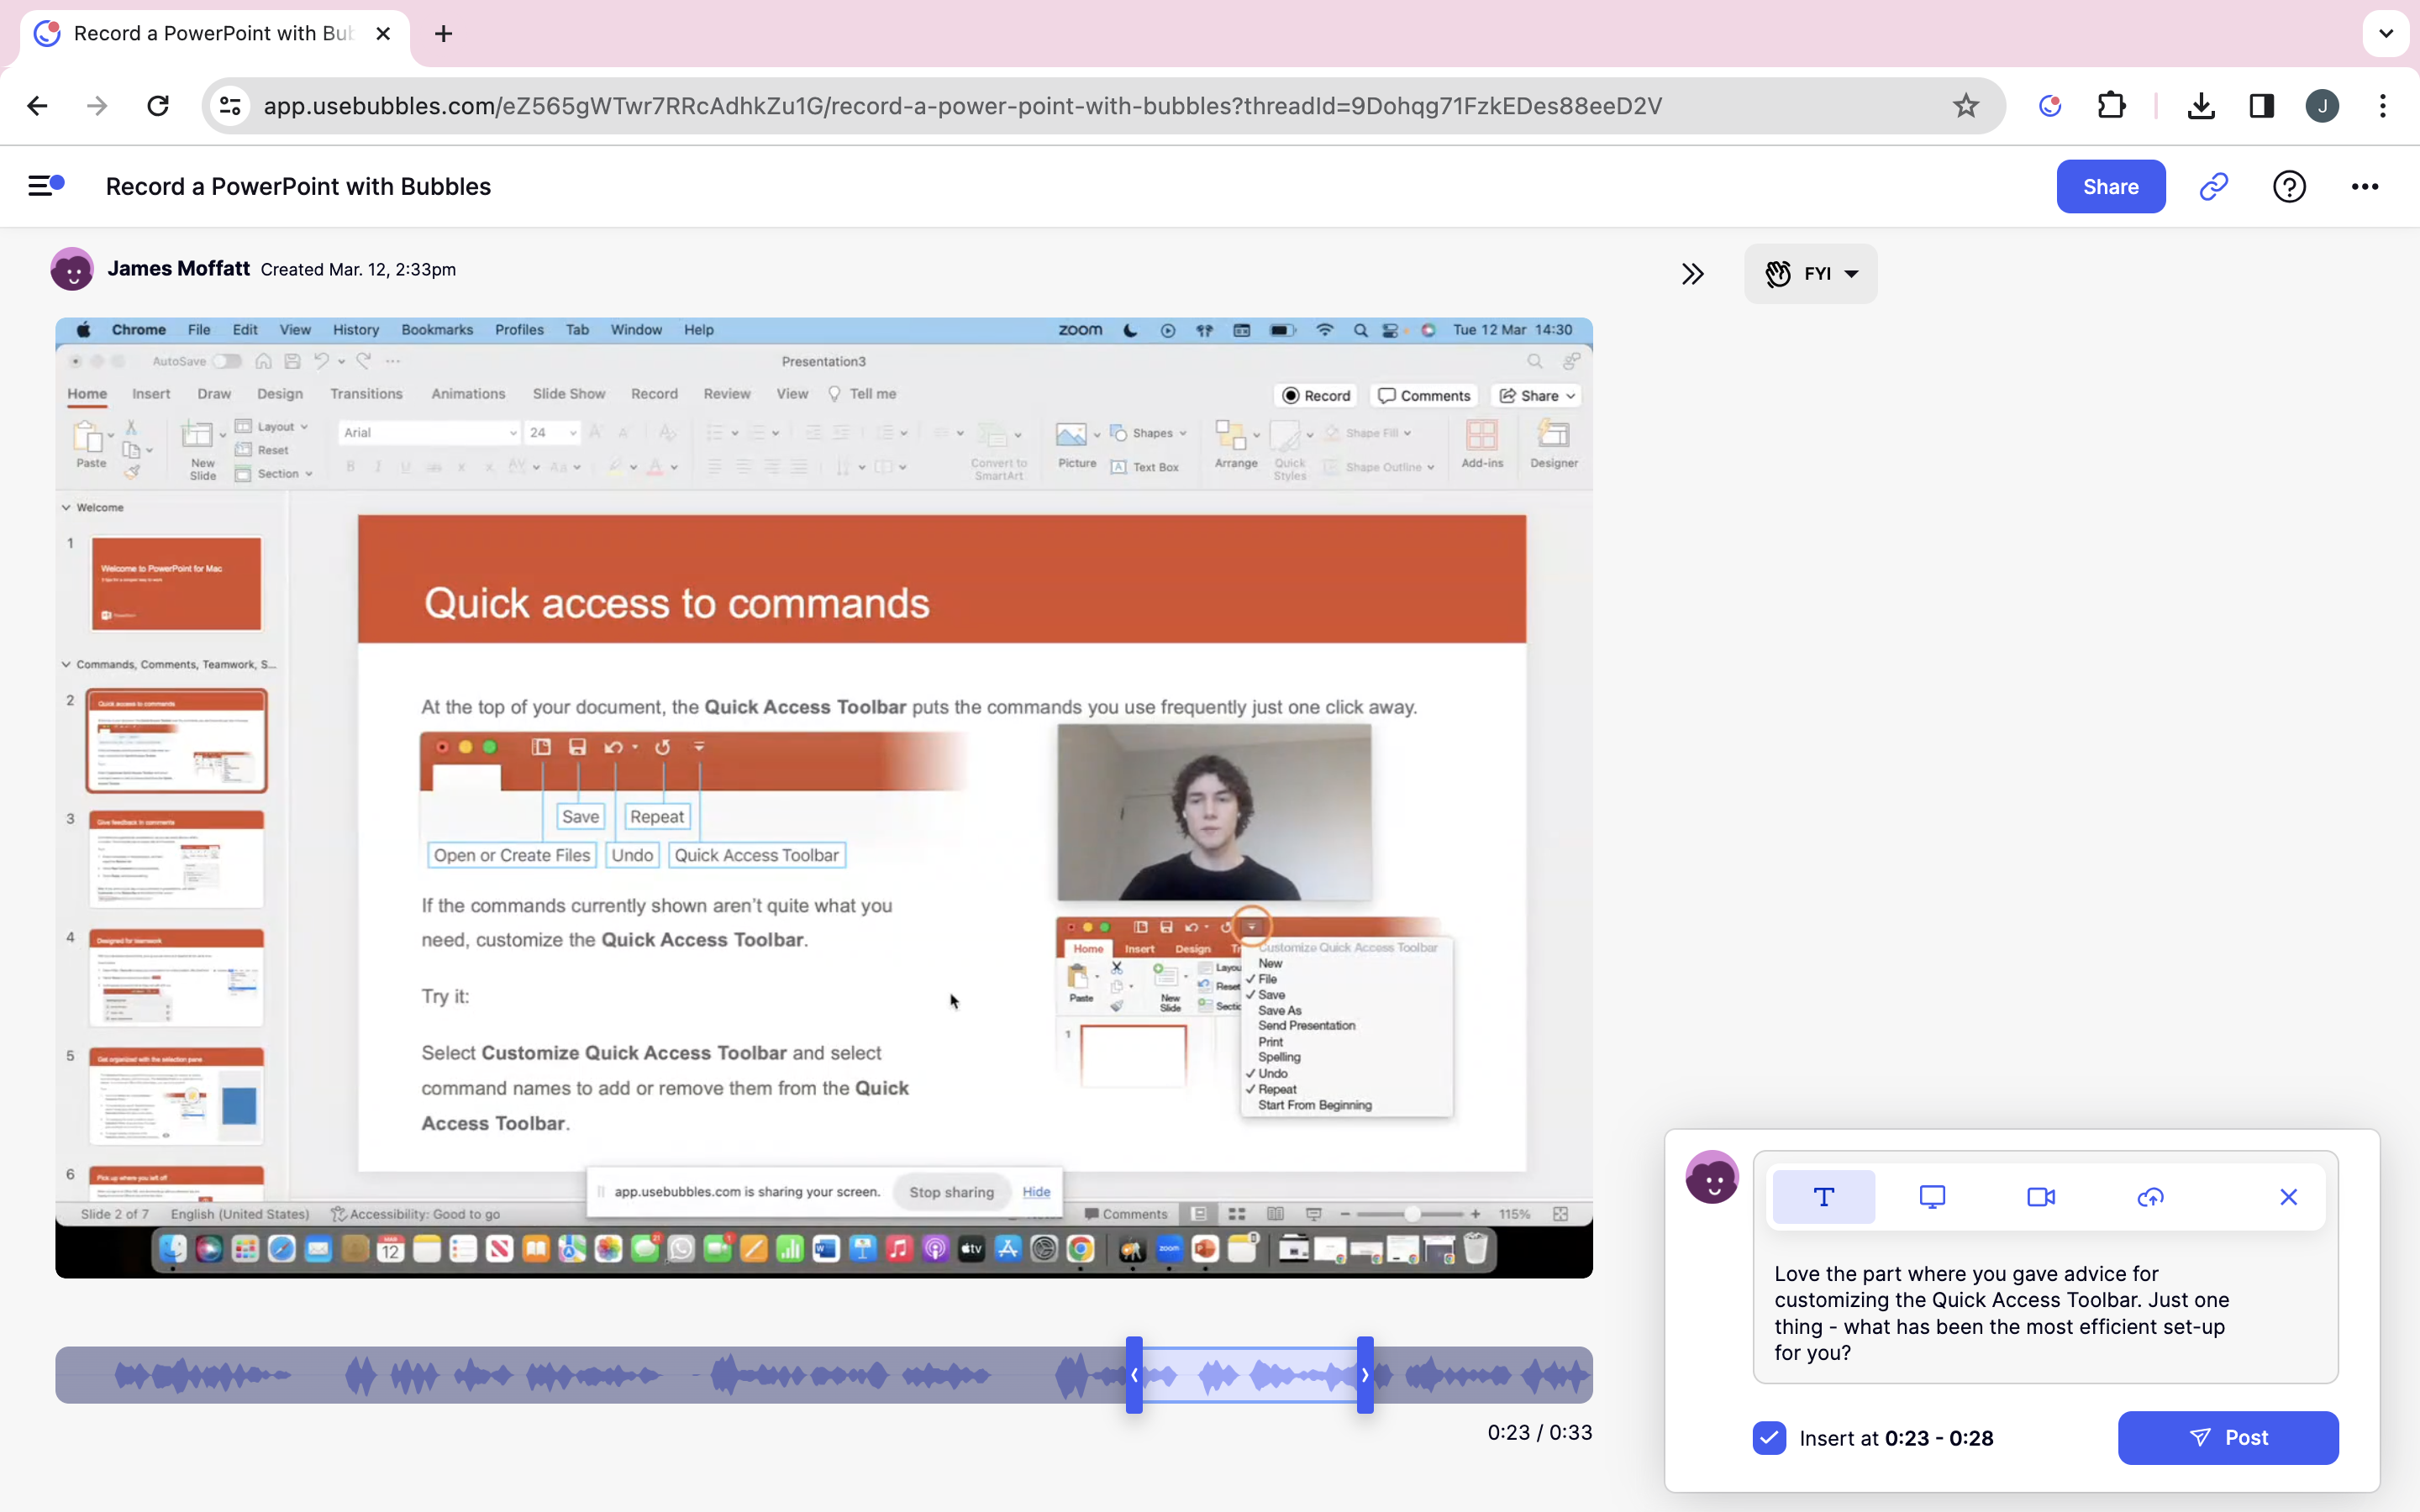
Presentation is a learning curve, hence why you are here to learn how to record yourself while you present. Remember though, the learning shouldn't stop at the software. Give yourself the best chance at improvement by requesting and listening to feedback on your presentation , being active in discussions around points you have covered, and by using Bubbles.
How to Improve Your Video PowerPoint Presentations
Again, the software you use is only a part of your presentation being successful, so I want to offer some further advice that is universally applicable. To make sure that your video presentation is effective, you should focus on a few basic but critical aspects:
- Create concise content, both when it comes to the slides themselves, and the verbal aspect.
- Avoid overcrowding your slides with text, and get to each point quickly, only elongating explanations where necessary to keep your audience engaged.
- Add some humor, quirky phrases or idioms to your presentation if it is appropriate, as this can grab attention and again, boost engagement.
- Make eye contact and present with confidence. This is why I am an advocate for always presenting with video of yourself alongside, as you maintain the interactive nature of a good presentation, and can, to some extent, keep some eye contact through the webcam.
So, we have reached the end of the guide. Follow this advice, alongside my guidelines and advice for utilizing the right tools, and you will ace it. I can rest easy knowing that I now have full faith in you to create professional-quality presentations with video that effectively get your message across, whether for business, education, or personal projects. Good luck!
⚡️ Supercharge your meeting productivity Learn how in under 2 mins:
Collaborate better with your team.
Get your point across using screen, video, and audio messages. Bubbles is free, and offers unlimited recordings with a click of a button.
.png)
More from Bubbles

Where Are Microsoft Teams Recordings Stored? All Possibilities Explained
No one wants hassle post-meeting. If you've ever struggled to find or organize your Teams recordings, we have all the information that you will ever need within this article.


How to give website design feedback that doesn’t suck
If you need to give effective website design feedback, look no further. This guide will get your design review process running like a well-oiled machine.
How to Add Zoom to Outlook: Quick Setup Guide
Streamline your meeting experience by learning to add Zoom to Outlook.

How to Do Breakout Rooms in Zoom
Creating breakout rooms is one of Zoom’s most useful features. Learn everything you will need to know about creating and managing them here.

Building a no-nonsense content approval workflow
The quick, no-nonsense guide to building painless and efficient content approval workflows.

AI Stats and Work Trends 2024: Microsoft Work Trend Index Analysis + Podcast
Explore the latest AI statistics and emerging work trends for 2024, and find out what these patterns mean for the future of work.
AI Notetaker tools
Clipchamp vs SendSpark
Dive into the details of Clipchamp and SendSpark, their unique qualities and problems, and discover a powerful alternative in our review.

Wistia vs Vidcast
Evaluate the strengths and shortcomings of Wistia and Vidcast, and discover a superior alternative in our detailed analysis.

Hippo Video vs BombBomb
Explore an in-depth comparison of Hippo Video and BombBomb, examining their functionalities, strengths, and weaknesses, and uncover a superior solution through our detailed evaluation.
Hey, before you continue...
With Bubbles you can turn conversations into actions:
- Use AI to record and summarize meetings with action items
- Eliminate live meetings with quick videos and screen recordings
